Microsoft Excel: How to select rows and columns
Microsoft Excel: How to select rows and columns
In this article, we will guide you through various methods to select rows and columns in Excel, including some helpful shortcuts.
Efficiency is the name of the game when it comes to Excel. Selecting rows and columns might seem like a small task, but it opens the door to endless possibilities for data transformation and customization.
How to select an entire column in Excel
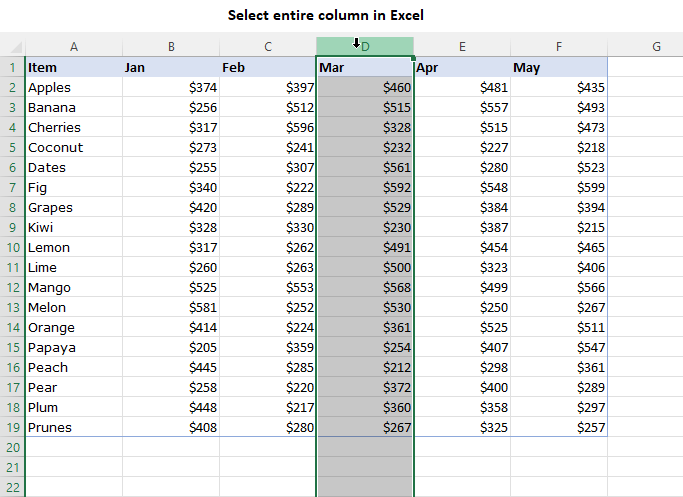
Selecting an entire column in Excel is simple. Just click on the column header, which displays the letter corresponding to the column, such as A, B or C. By clicking on the header, the entire column will be highlighted, indicating that it is selected.
Alternatively, you can use a keyboard shortcut to select a whole column in Excel:
1. Click on any cell within the column.
2. Press Ctrl + Spacebar together.

How to select a whole row in Excel
Similar to selecting a column, selecting a whole row in Excel is straightforward. Just click on the row header, which displays the row number, such as 1, 2 or 3. This will highlight the entire row, indicating that it is selected.
An entire row can also be selected with a simple shortcut:
1. Click on any cell within the row.
2. Press the Shift + Spacebar keys simultaneously.

How to select multiple columns in Excel
To select two or more columns in Excel, you have a few options at your disposal:
Mouse method. Click on the header of the first column you want to select and drag your mouse to the header of the last column. As you do so, all the columns in between will get highlighted.
Shift key. Another quick way to select several adjacent columns is this:
- First, click on the header of the column from where you want to start your selection.
- Then, while holding down the Shift key, click on the header of the column where you want your selection to end.
Keyboard shortcut. To streamline your workflow even further, you can use keyboard shortcut. Select several adjacent cells in one row and press the Ctrl + Space keys simultaneously to select the entire columns.

Tip. When you want to freeze selected rows, keep in mind that Microsoft Excel allows freezing only rows at the top of the spreadsheet. To achieve the effect of freezing specific rows, select the row below the last row you want to freeze, and then utilize the Freeze Panes feature.
Select non-adjacent columns in Excel
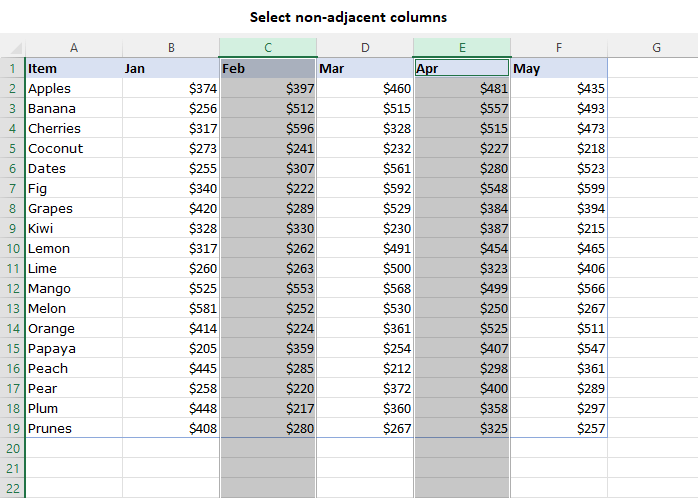
To select multiple non-adjacent columns, hold down the Ctrl key on your keyboard while clicking on the headers of the desired columns. Each time you click on a column header, it will be added to your selection.

This method allows you to cherry-pick specific columns from different areas of your worksheet, empowering you to apply operations or formatting exclusively to those chosen columns.
How to select multiple rows in Excel
Selecting multiple rows in Excel is a fundamental skill that allows you to work efficiently with data sets of varying sizes. Let’s explore different methods for selecting multiple rows in Excel.
Select adjacent rows
To select multiple contiguous rows, you have a couple of options:
- Click on the header of the first row you wish to select and drag your mouse to the header of the last row.
- An alternative method is to select the first row, then hold down the Shift key while clicking on the header of the last row. This method quickly highlights a range of consecutive rows without the need for dragging the mouse.
- Or you can just select the first cells in the target rows and use Shift + Space shortcut to extend the selection to entire rows.

Select non-adjacent rows
To select individual non-adjacent rows, you can utilize the Ctrl key on your keyboard:
- Hold down the Ctrl key.
- Click on the headers of the desired rows while holding down the Ctrl key. Each row you click will be added to the selection.
This method is useful when you want to perform specific manipulations on specific rows without affecting others.

Select multiple rows using the Name box
In addition to the conventional methods of selecting rows in Excel, there’s another handy technique that involves using the Name box.
To select multiple adjacent rows using the Name box, follow these steps:
- Click on the Name box to activate it.
- Enter the reference of the range of rows you want to select. For example, to highlight rows 3 to 10, enter “3:10” into the Name box.
- Press the Enter key.

Tip. In case you have predefined names for specific rows, click on the drop-down arrow in the Name box and select the desired name from the drop-down list.
Select column to end of data
To quickly select a column that extends to the end of the data range, you can use the Ctrl + Shift + Down Arrow keyboard shortcut. Here’s how:
- Click on the first cell in the column or on any other cell where you want to start the selection.
- Hold down the Ctrl and Shift keys and then press the Down Arrow key.
This shortcut will select the entire column from your current position to the last cell in the column that contains data.

This technique is especially handy when working with large datasets, as it saves you the effort of manually scrolling and selecting the whole column.
Select all rows below in Excel
The Ctrl + Shift + Down Arrow shortcut can also be used to select all the rows below a certain point in Excel. Here are step-by-step instructions:
- Select the first cell in the row where you want to start the selection.
- Hold down the Shift key and use the Right Arrow key to extend the selection to as many columns as needed.
- Release the Shift key once you have selected all the necessary columns.
- Now, it’s time to select all rows below. Press and hold the Ctrl and Shift key simultaneously. While holding down both keys, press the Down Arrow key.
Excel will automatically select all the rows below, from the starting point you selected until the last row of data in your dataset.

Expanding on the same concept, you can select all rows above, to the right, or to the left of a given row using keyboard shortcuts. To achieve this, combine the Up, Right, or Left arrow keys with the Ctrl + Shift shortcut.
For example, to select all rows above, hold Ctrl + Shift + Up Arrow.
Similarly, use Ctrl + Shift + Right Arrow to select all rows to the right and Ctrl + Shift + Left Arrow to select all rows to the left.
These shortcuts provide additional flexibility in selecting rows based on your specific needs, so you can perform calculations or formatting on a subset of data.
Note: Be aware that this method only selects non-empty rows. So, make sure to consider the presence of gaps in your dataset when using this selection technique.
Select columns and rows in Excel table
When working with formatted tables in Excel, you have access to a convenient and intuitive way to select specific columns and rows.
Selecting a column in a table
Selecting an entire column in a table is a breeze with these techniques:
To select a table column, simply hover the mouse cursor over the top edge of the column header. As you do so, a small black selection arrow will appear. Clicking the top edge once will select the column data without the header. If you click it twice, the entire table column, including the header, will be selected. This way, you can highlight either the column’s data or the entire column in one or two clicks.

Alternatively, you can click anywhere within the table column and press the Ctrl + Spacebar keys together. Pressing the shortcut once selects the column data, while pressing it twice selects the entire table column along with its header. This way you can accomplish column selection without relying solely on the mouse.
Selecting a row in a table
When it comes to selecting a whole row in a table, Excel offers a similar straightforward technique:
Hover the mouse cursor over the left border of the row until the small black selection arrow appears. This indicator signifies that clicking on the border will select the entire row.

Another option is to click on any cell in a given row, and then press the Shift + Spacebar shortcut. This combination of keys enables you to select the entire row effortlessly, regardless of your current position within the row.
Select rows with certain value in a column
To select all rows that have a specific value in some column, you can use Excel’s Filter feature. Follow these steps to filter and select the desired rows:
- Select any cell within your dataset.
- Go to the Data tab and click on the Filter button. This will enable the filter functionality and add filter dropdowns to each column header.
- In the column that contains the specific value you want to filter by, click on the filter arrow and pick the desired value(s) from the drop-down menu. Excel will filter the data and display only the rows that match the selected value.

Once the filtering is applied, you can select the filtered rows using either the mouse or convenient cell selecting shortcuts.

Now that you’ve successfully selected the rows that meet your criteria, you can perform various actions on them. Copy the selected rows to another location, apply specific formatting, perform calculations, or analyze the data further based on your requirements.
Related Articles
Microsoft Excel: How to freeze Rows & Columns
Microsoft Excel: How to freeze Rows & Columns Freeze the Top Row or First Column Click on the View tab on the Excel Ribbon. Click the drop-down for Freeze Panes. Click Freeze Top Row – allows scrolling down many rows and still shows the top row. OR ...Microsoft Excel: Transpose (rotate) Data from Rows to Columns or Inversely
Microsoft Excel: Transpose (rotate) Data from Rows to Columns or Inversely If you have a worksheet with data in columns that you need to rearrange into rows; use the Transpose feature. With it, you can quickly switch data from columns to rows, or ...Microsoft Excel: How to print row and column headers on every page
Microsoft Excel: How to print row and column headers on every page In printing spreadsheets; the top row is printed only on the first page. Here is how to repeat the header row on your print jobs. Repeat Excel header rows on every page Your Excel ...Microsoft Excel: How to make pivot charts
Microsoft Excel: How to make pivot charts The tutorial shows how to quickly create, filter and customize pivot charts in Excel, so you can make the most of your data. If you’ve ever felt overwhelmed by a large and cluttered spreadsheet, you’re not ...Microsoft Excel: Text to Columns
Microsoft Excel: Text to Columns Data imported from other spreadsheets or databases is already separated into fields, using something called a field delimiter: a comma, tab, space, or custom character – to separate one field from another. These ...